
Shoulders Back! Part 2: Strength and Mobility

In part one of this series, we discussed some basic shoulder anatomy, what commonly goes wrong when it comes to positioning the shoulders as riders, and how to properly position the shoulders. Now we are going to delve a little deeper into the role of the shoulder mechanics in maintaining an elastic contact, and some off-horse exercises to help you groove the right motor patterns and build strength and endurance.
Biomechanics Review
Like horses, our arms (or forelimbs) are connected to our bodies by soft tissues, via the shoulder blade. This makes it very mobile, and also very susceptible to poor movement patterns, like slouching forward and rounding through the shoulders. On the horse, this leads to some common complications:
1. Energy Leaks and loss of balance:
When the shoulders roll forwards, we are likely to round through our upper backs which can result in getting left behind the motion of the horse. It can also potentially place a lot more strain on the neck and low back as they are no longer optimally aligned to receive the compressive forces of the horse’s motion. When the rider is behind the motion of the horse, they are more likely to stiffen through the contact and close up through the hip joint causing gripping up of the legs. If this sounds like a familiar pattern, consider adding in a few of the exercises below which are aimed at increasing the mobility of your upper back and the strength or your postural stabilizing muscles.

When the shoulders round forward, the rib cage begins to slide backwards out between them. This will result in the rider’s centre of gravity moving back. To compensate, the head will move forward, and the hip flexors (red star) will turn on resulting in a leg that wants to grip up. Try it now!
2. Stiffening of the arm
Many times when riders attempt to give forward with the arm, they mistakenly do so by allowing the shoulder blades to drift forward around the rib cage. When this happens, our ability to glide the upper arm forward freely is actually impeded as a bony tubercle at the top of the humerus rolls forward into the way. Extra stabilizing muscles turn on to hold the elbows in place away from the body. In addition, the rider is now likely behind the motion of the horse, increasing the natural temptation to tighten the arm even more.
In contrast, setting the shoulder blades correctly opens up the space in the front of the glenohumeral joint so that the arm can move freely forward. The elbow drops naturally to the side of the body and the thumbs can naturally turn up. There is now a straight line from the elbow to the bit that the elbow can travel along with no extra effort. The upper arm can relax as it does not need to support the elbow at an awkward angle away from the body.
When the shoulders roll forward, they also rotate inward. The chest will cave in, the elbows will widen and the hands will rotate downward.

In this photo, things are going well enough at first glance. But if you look closer, my shoulders have started to round forward, my hands have turned down and in towards one another, the elbows are out, and I am starting to roll onto the the back of my seat as my energy (centre of gravity) leaks backwards. In this position my hip flexors will start to tighten to stop me falling back further and I’m at risk for gripping up with my knee. Bizzy, bless her, is holding it together quite well in this moment but look what happens a few strides later…
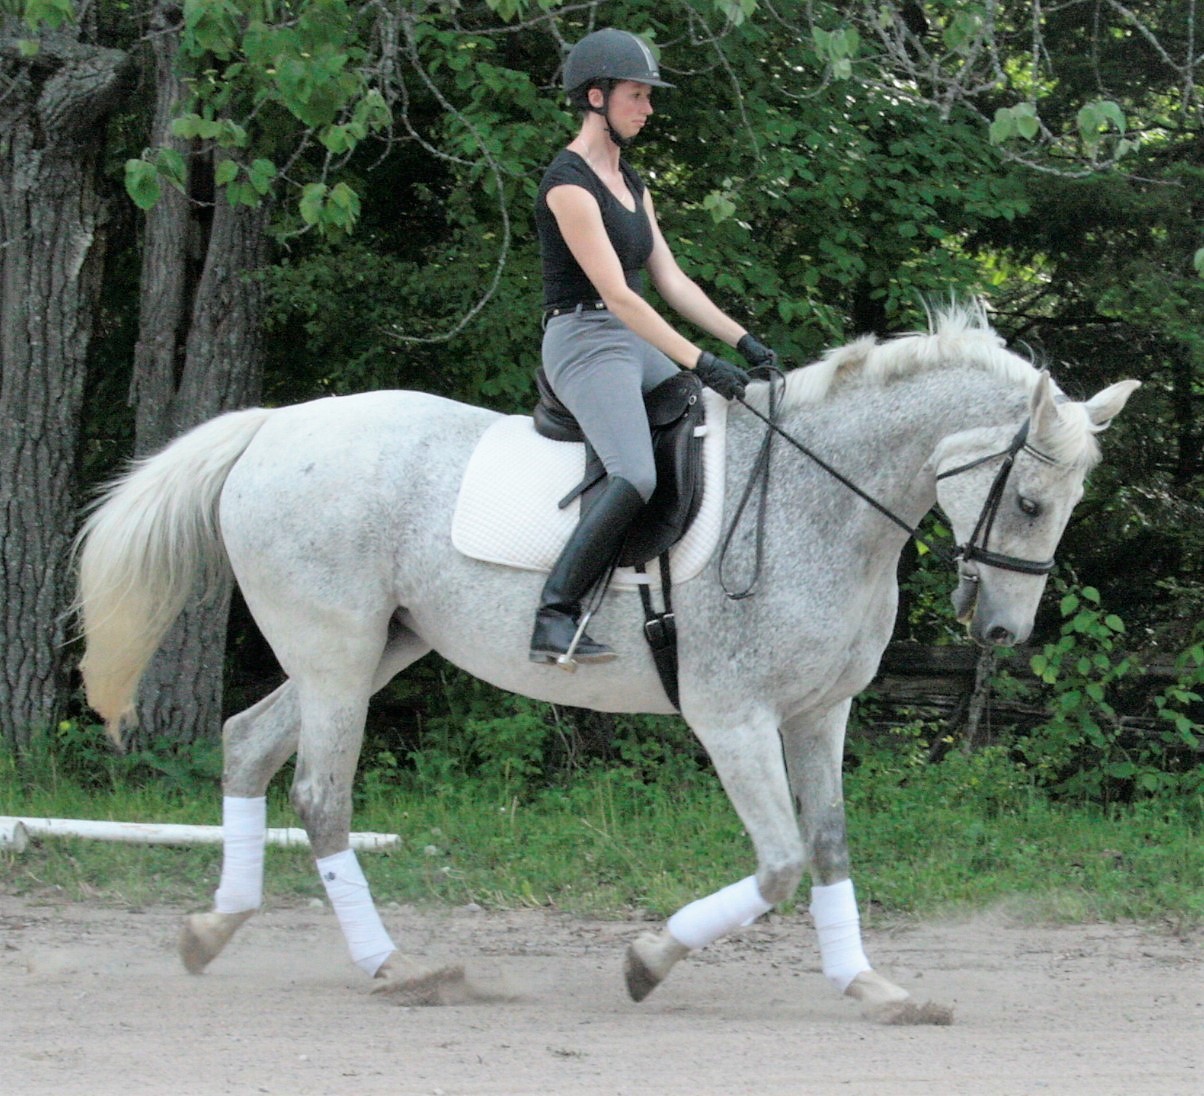
A few strides later, Bizzy responds to my loss of balance and stiffened arms by curling up through her neck and falling onto the forehand. If only I had kept my shoulder blades positioned!
Putting it into Practice
Separating the two types of shoulder motion
As we discussed in part one, the shoulder blades should remain back and down to ensure postural stability, and the glenohumeral joint must be able to relax to allow the rider to have an elastic contact via the reins. It is worthwhile to practice letting your upper arm swing and move as you keep your shoulder blades stabilized. Seat your shoulder blades as described in part one, and then see if you can reach your arm forward and back (that’s your glenohumeral joint motion) without losing the position of the shoulder blade. Once you can do this, try it as you are walking along.
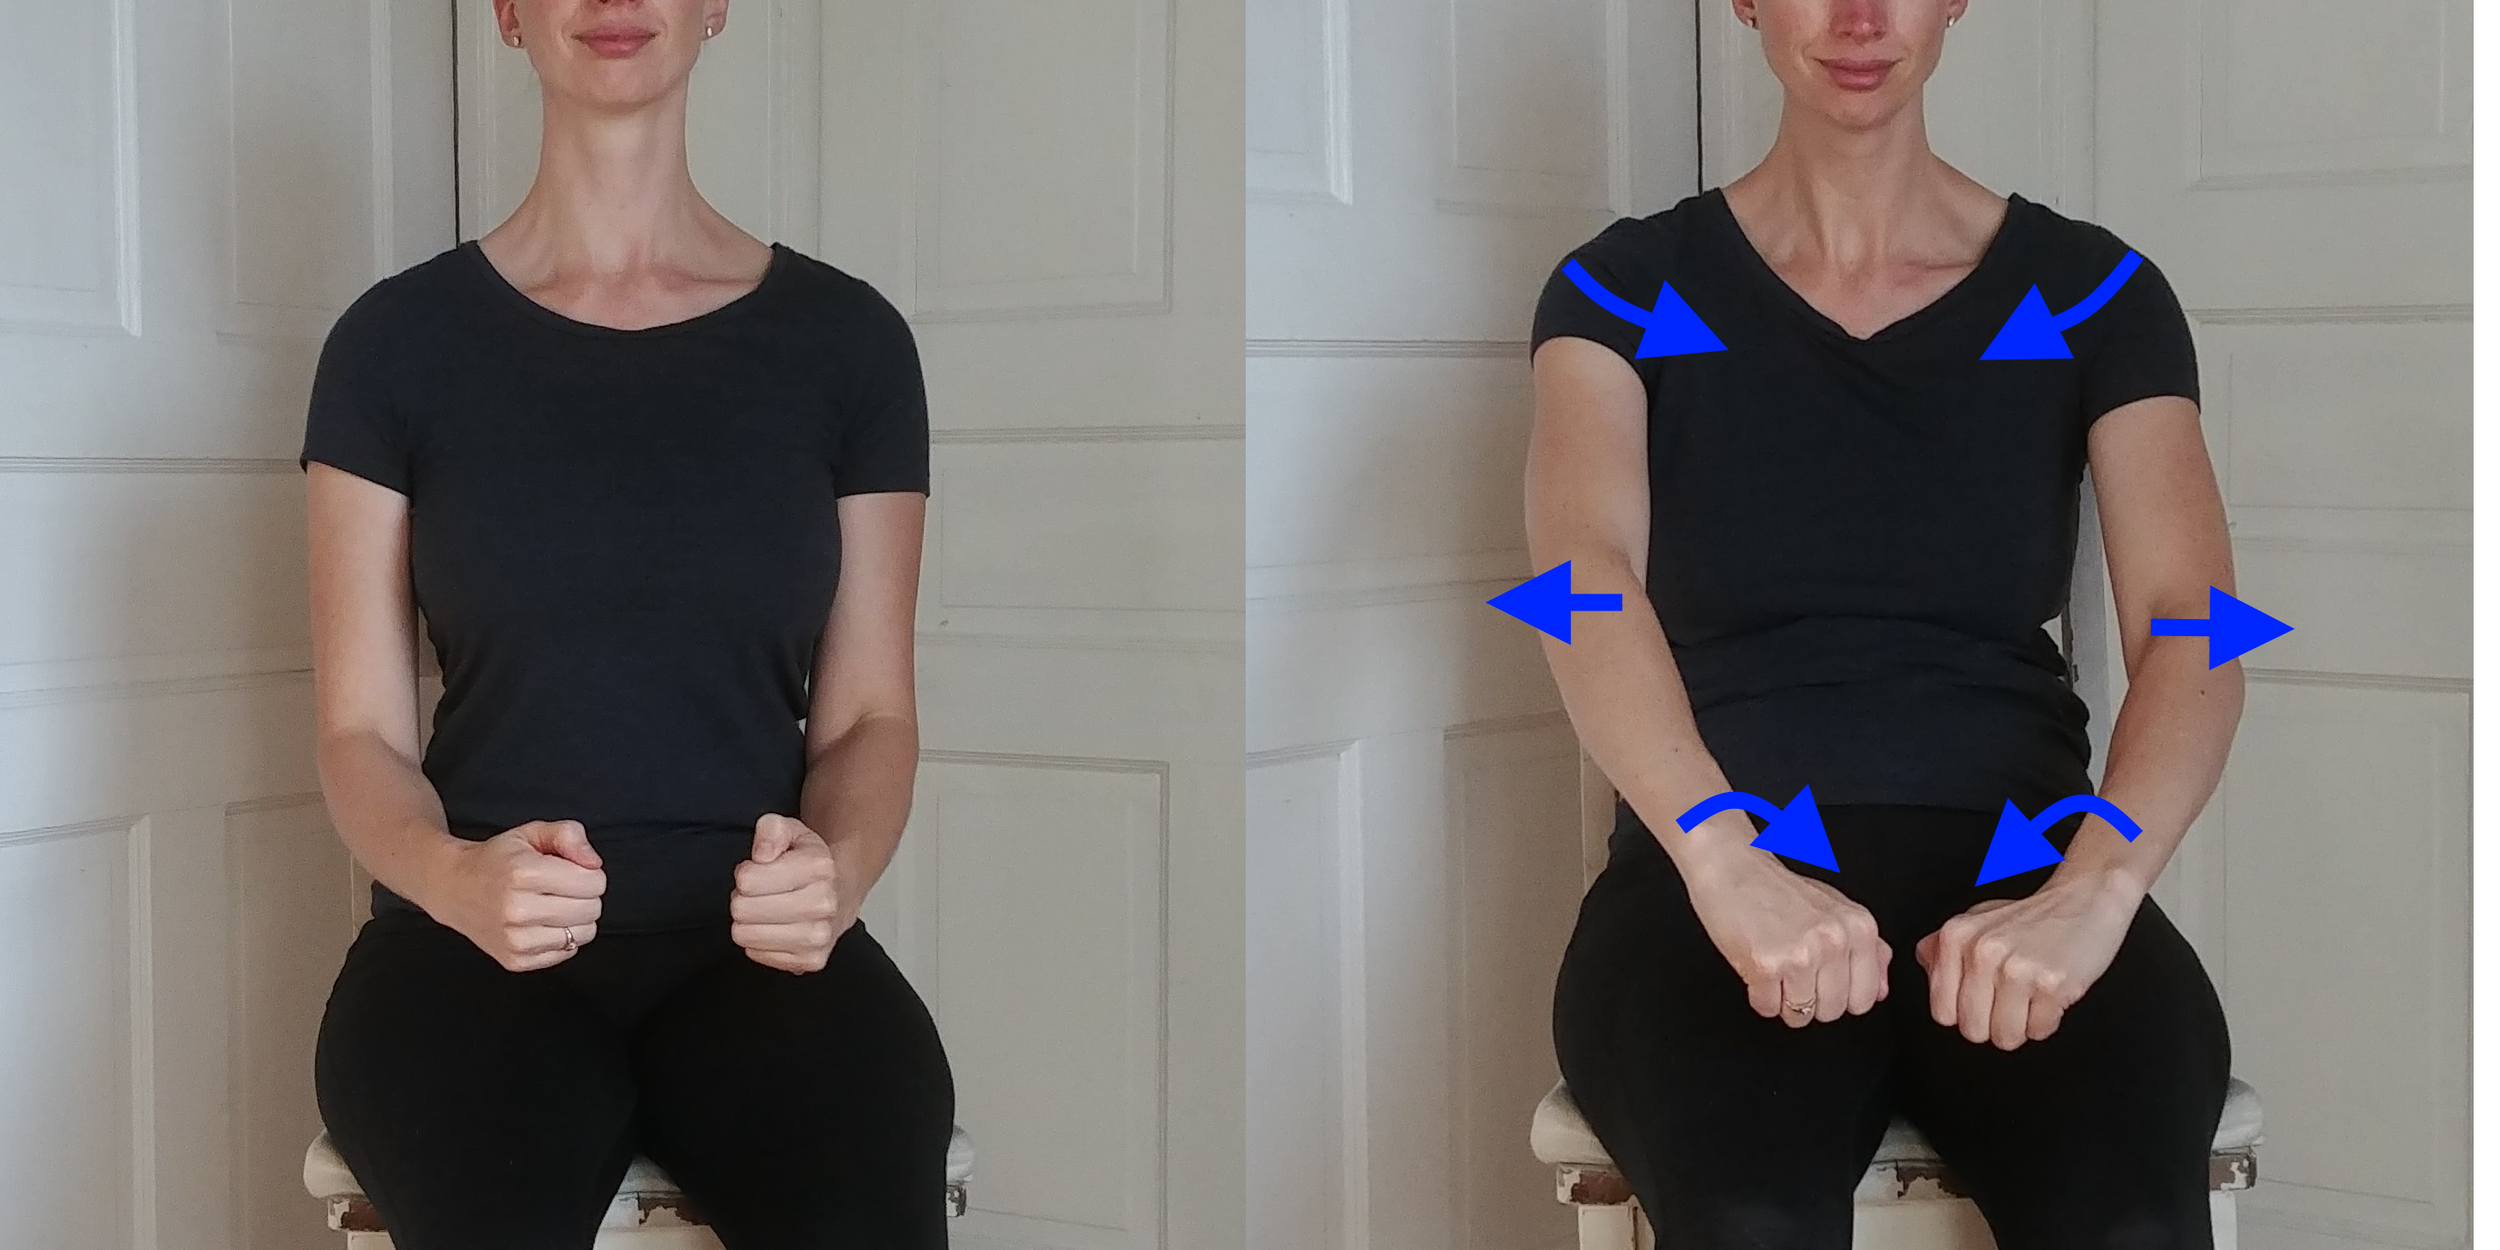
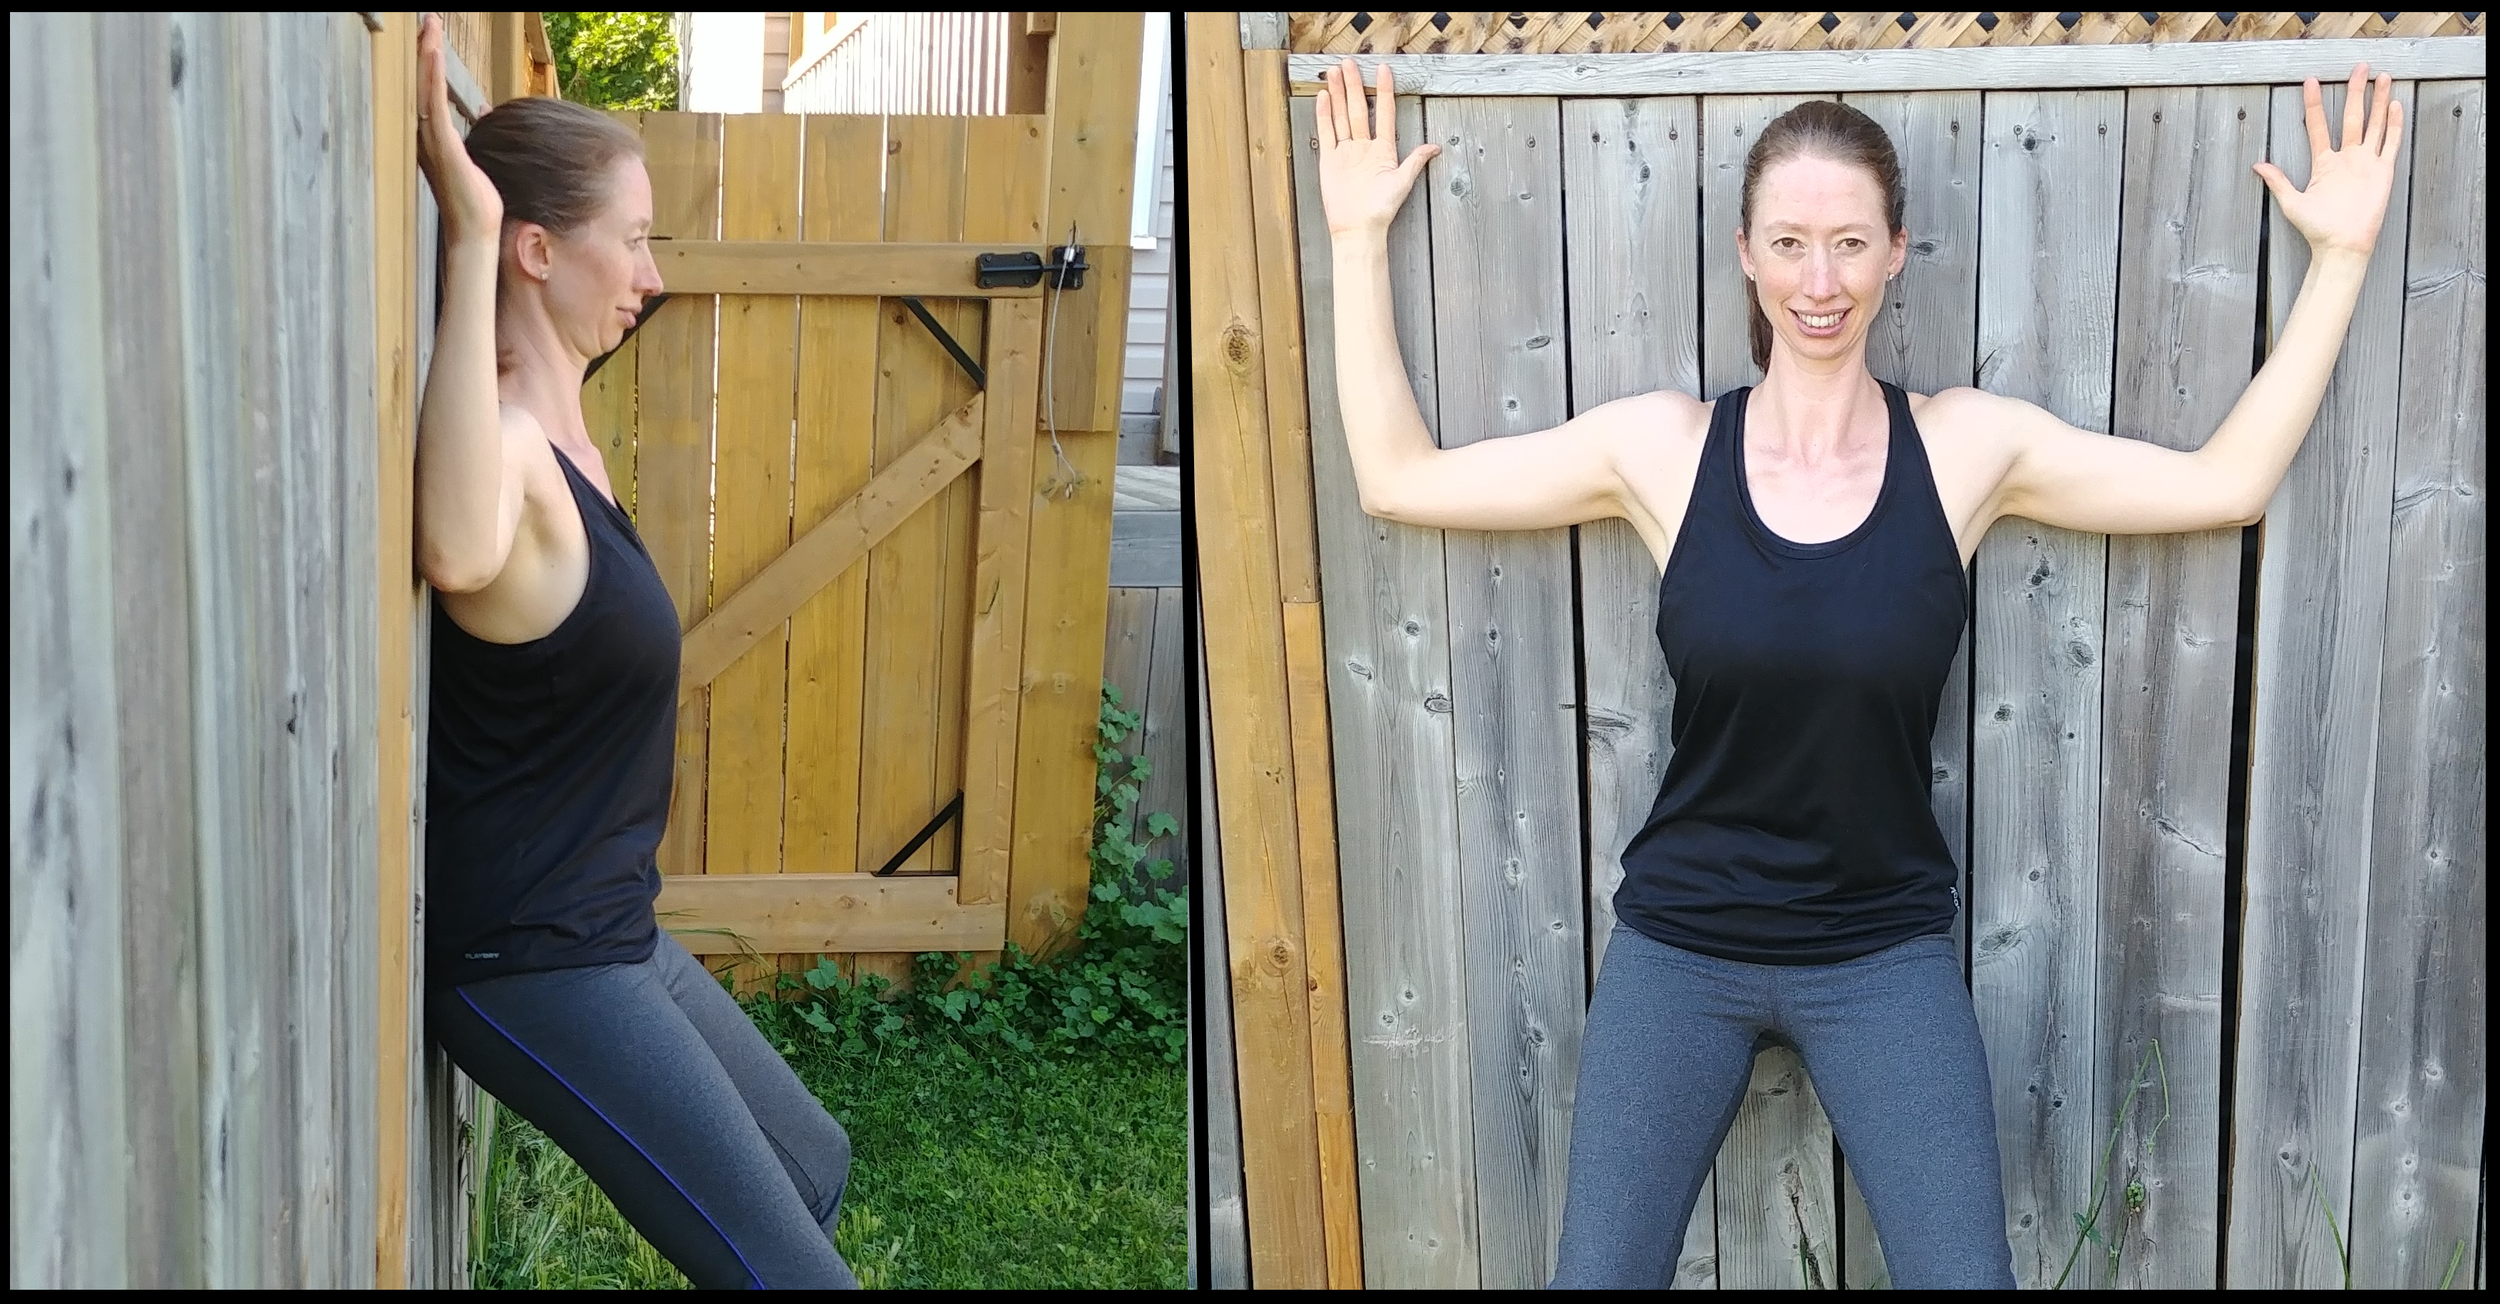
Exercise 1: Rows
This is a great exercise to strengthen the postural muscles while grooving the motor pattern you want to have on your horse (shoulder blades back and down, glenohumeral joint mobile).
Begin in a slight lunge stance and ensure that your upper body doesn’t lean back. Do a slight pelvic tilt to ensure that your lower back isn’t arching and tuck your chin slightly. Using a stretchy exercise band or tubing, step back with straight arms until you feel tension.
With the arms still straight, retract your shoulder blades back and down as you have been practicing.
From this position, bring a bend into the elbows, keeping enough strength in your core to keep your upper body from coming backwards.
Return to your starting position and repeat. Work up to three sets of ten at a resistance level that challenges you without sacrificing your impeccable form!
Putting it together back in the saddle
You should be able to follow the movement of the horse’s head and neck without compromising the position of the shoulder blades. Be sure to allow some bend to come into the elbows while maintaining a correct height of your hand to make a straight line from your elbow through the hand to the horse’s mouth. Remember, the elbow gliding back to rest at your side is not the same as pulling, it is simply the relaxed arm returning to where gravity dictates. From there it is ready to glide forward again in a following motion or to resist for a moment if required to help the horse re-balance or complete a downward transition.
Gaining mobility through the upper back
To maintain optimal balance, riders need to ensure that they maintain the ability to straighten through the upper back. Those of us who spend a lot of time hunched over a desk during the day can lead us to develop postural patterns that cause the upper back to round, the chest muscles to shorten, the shoulders to protract forward and up, and the elbows to come out away from your body. To help to maintain their upper back mobility with a few targeted stretches and strengthening exercises for their postural muscles. Like brushing your teeth, these should be done regularly as a part of your daily spinal hygiene routine!
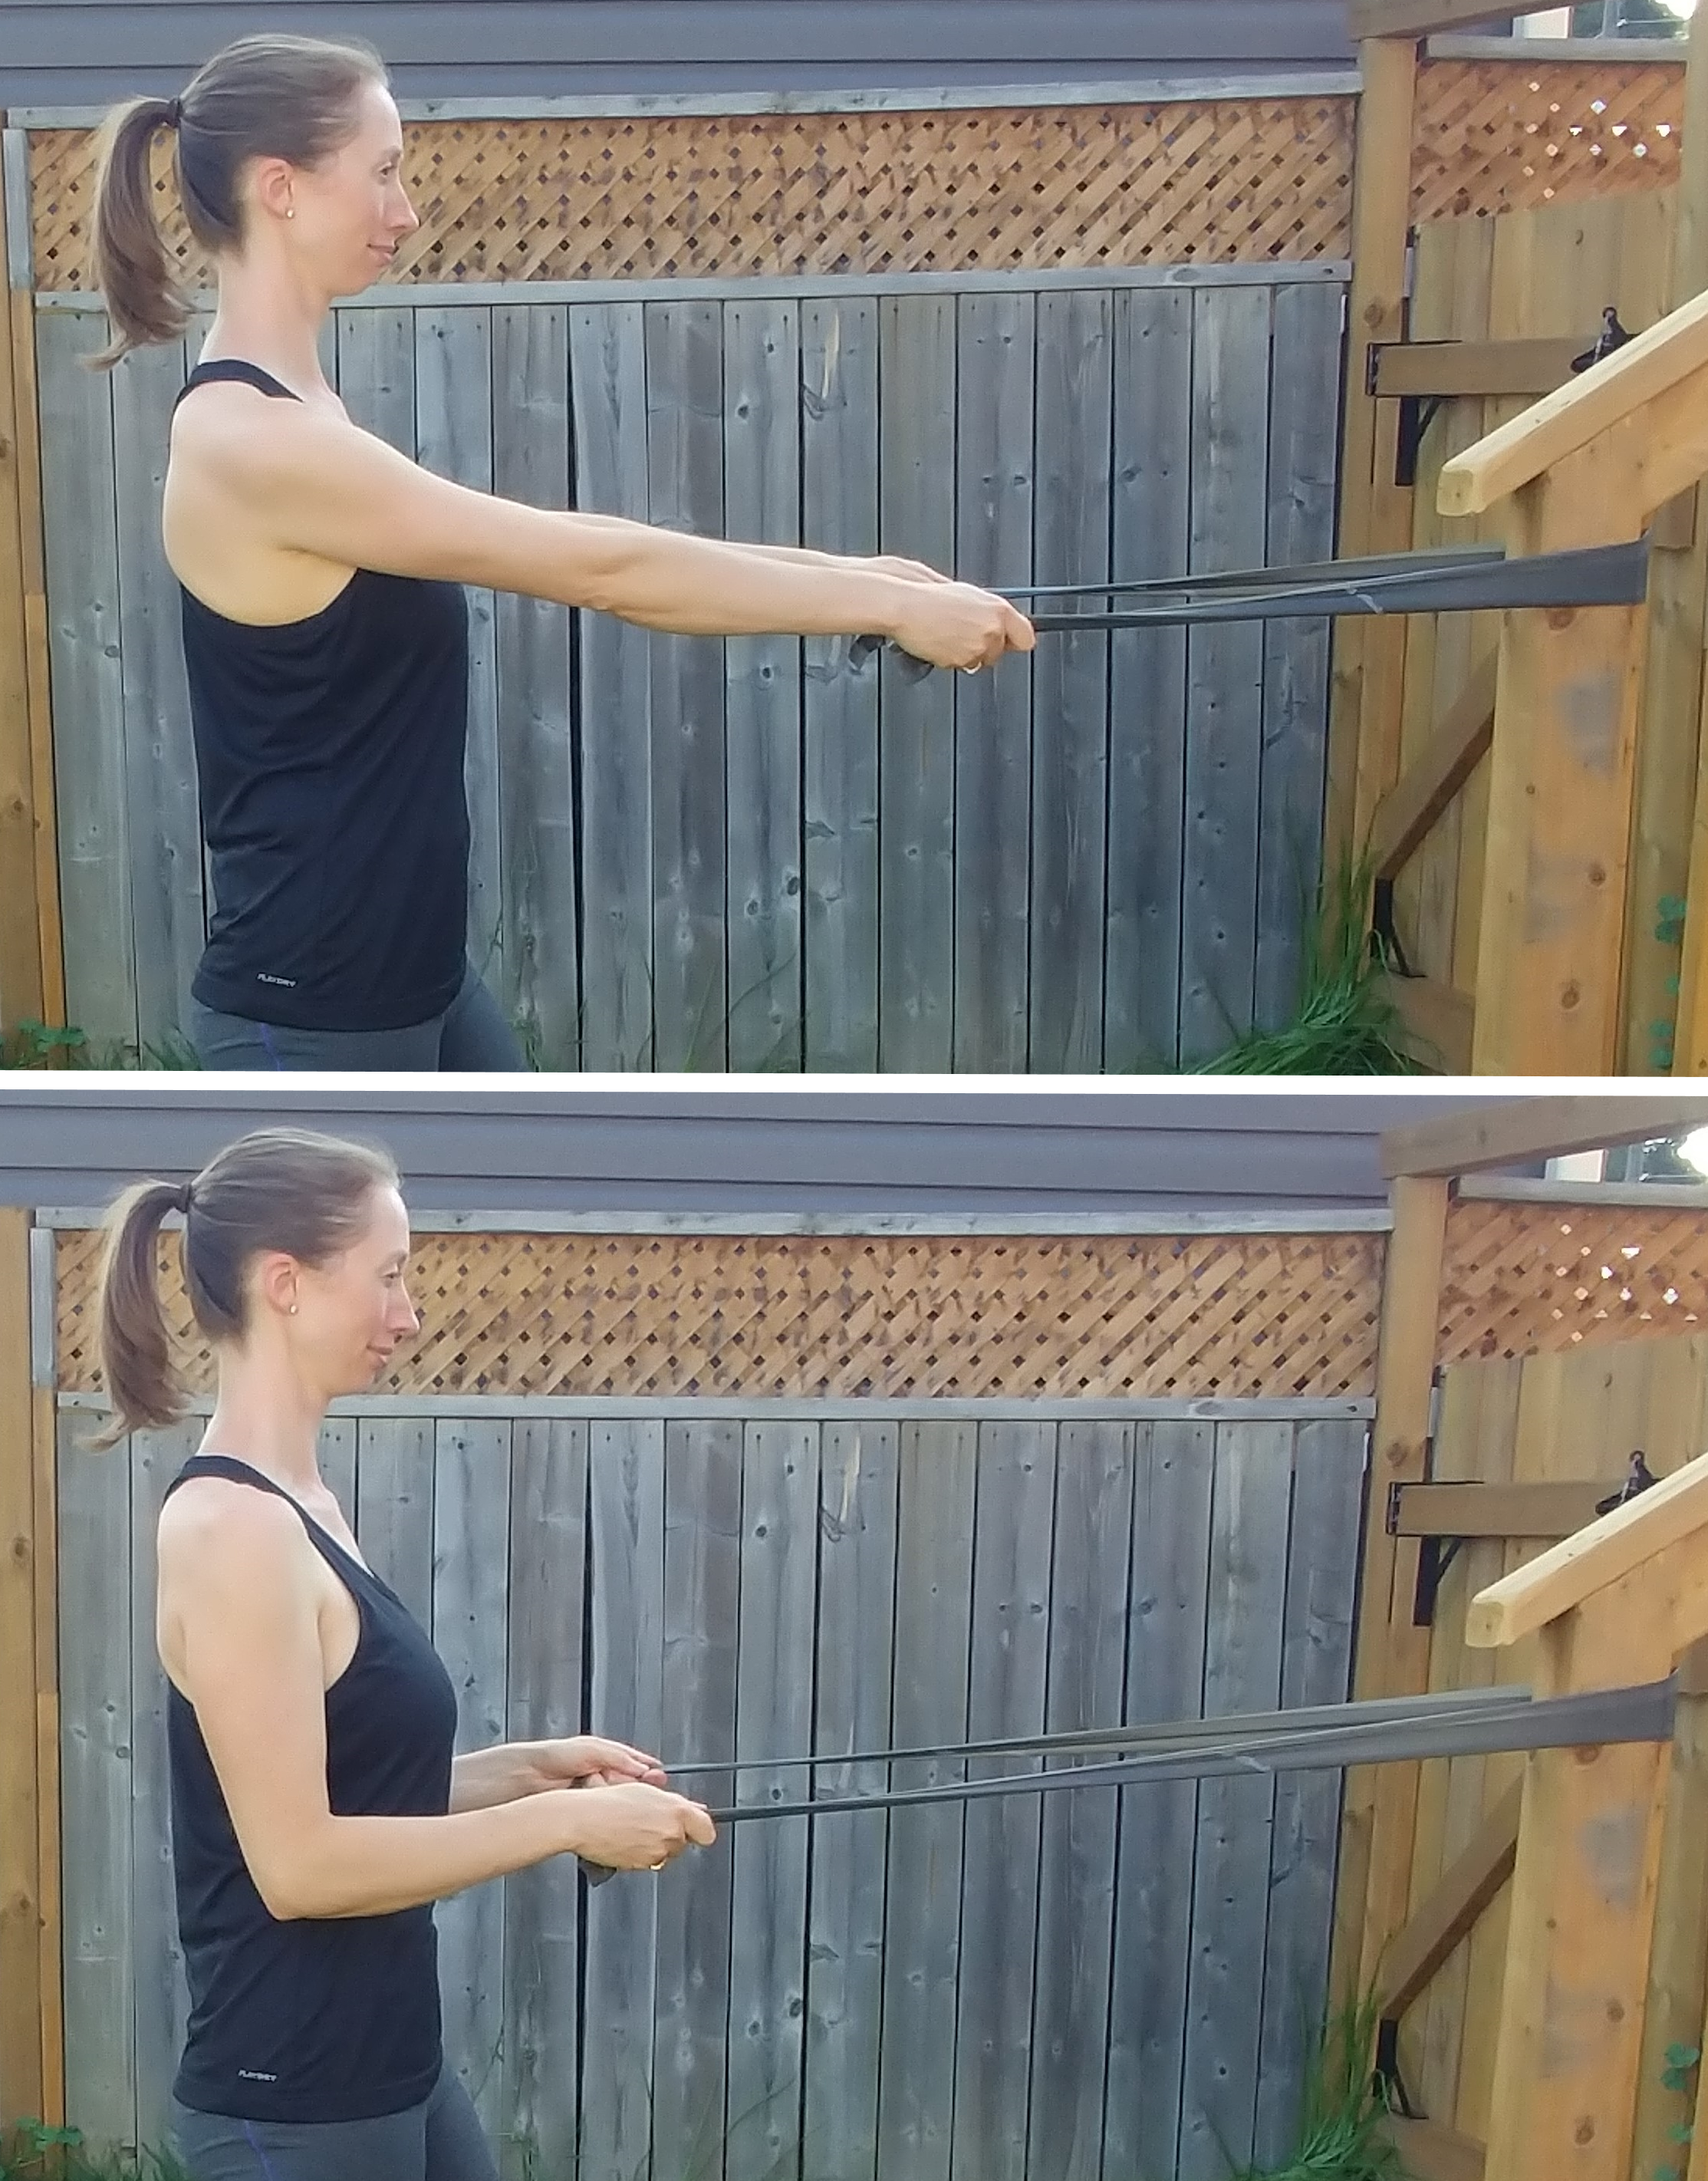
Exercise 2: Wall Angels
This is one of my all-time favourite exercises for riders as it gives instant feedback about the position of your whole head, neck, spine and arms. The goal here is to get the postural muscles firing in the back while opening through the front of the chest - without allowing the low back to arch! When done correctly it is surprisingly challenging!
As you bring your arms into position, notice the temptation to allow the lower back to curl off the wall. Resist by tightening your lower abdomen, squeezing the glutes and flattening the low back against the wall.
1. Align yourself as shown, remembering to set your shoulder blades back and down. If you have shoulder pain that prevents you from achieving the “goal post” position shown, straighten your arms and keep them below shoulder height, with your palms facing forward.
2. The devil is in the details. You want to feel contact with your low back, upper back, back of the head, shoulders, elbows, wrists and hands. Don’t allow the shoulder to creep up towards your ears! Hold the position for one minute several times per day.
3. If you want more of a challenge, try sliding your arms slowly up and down the wall, maintaining all of your contact points.
4. If you are unable to keep your low back flat and your shoulders in position (or close to), try doing the same exercise on your back instead, where gravity will assist you in opening through the chest and shoulders. Keep the knees bent and the abs and glutes turned on. If needed, place a small pillow or folded up towel behind your head to take up the gap and give you something to push into.
Making the transition from desk to saddle
You may not be able to police your posture every minute of the day, but there are a few things you can do to make the transition from desk to saddle more smoothly!
Set a timer for posture breaks at work every 30 minutes, where you stand up or at least stretch in your seat. Use this time to set your shoulder blades, open your chest and do a few chin tucks.
Work on a home exercise program like the one described here, so that you are actively maintaining the muscles you need to ride with the correct posture. You don’t have to spend three hours at the gym to make measurable improvements!
Be aware that when you get on your horse, coming in to that correct posture is going to feel like a BIG postural change! If you aren’t feeling a bit exaggerated at first, you may not be making the changes to a big enough extent. If you don’t have a mirror in your riding area, have someone video you so you can match what it feels like to reality.

When training postural changes, mirrors and videos are your friend!
I hope this two-part series has clarified the shoulder mechanism and given you some food for thought on improving your riding out of the saddle. Working on your body alignment and strength away from the barn saves a lot of incorrect miles put on the horse, which helps the horse’s soundness too! If you’ve tried these ideas out, let me know what you think! If you’re looking for any clarification, I’m just an email away.
Happy riding!
Steph :)


